
Hey guys! Here’s a fun little fact about me: I am the ULTIMATE snack-er. If I could get by with skipping every meal and snacking all day instead, I would. One of my all time favorite things to snack on is cheese. I’d eat it 24/7 if I could, but unfortunately, my metabolism won’t allow it. Anytime I have an excuse to entertain or host people, though, the first thing I think of serving is a charcuterie board, ‘AKA’ a cheese board. In the world of appetizers, the charcuterie board absolutely slays the competition. I mean, you can’t beat something that is filled with such deliciousness, is so aesthetically pleasing, requires absolutely ZERO cooking, and needs very minimal assembly or prep work. Because really, besides Martha Stewart, who has time to cook a full-blown meal when you’re already busy cleaning and preparing your home to be fit for guests? Not me.
Recently, I got my chance to host a little pre-gaming cocktail hour when my sister and brother-in-law were in town visiting my husband and I. Both they, and another couple from my hometown, came over for some cocktails and snacks before heading out for the night. I finally had an excuse to put together an over the top charcuterie spread, and I was thrilled. Both my sister and her husband appreciate a good cheese board, like myself, so it was the obvious choice of appetizer to serve them.
If you’re new to the world of charcuterie, never fear. I’ve put together this post to share the tips and tricks that I’ve picked up along the way, with all of you. Here is exactly how I put together my epic charcuterie board, and how you can create one for yourself:
First, double check that you have the appropriate presentation necessities to assemble and serve a charcuterie platter. If you don’t, you’ll want to purchase those things before you do anything else. To help make this part of the process as quick and easy as possible, I went ahead and linked a ton of really cute charcuterie board supplies in the ‘SHOP THE POST’ section below. Don’t worry, I’ve got you, boo. 🙂 Here is a list of possible charcuterie essentials that you may or may not need in order to build your epic spread:
- Cutting Board(s)
- Serving Platter/Tray
- Kraft Paper Roll (if you want food to overflow beyond cutting board)
- Cheese Knives
- Small Glass Bowls or Ramekins
- Labels/Flag Markers
- Napkins or Small Appetizer Plates
- Stemware/Beer Glasses (or other alcoholic beverage glassware)
SHOP THE POST

Next, it’s time to go grocery shopping for your charcuterie platter ingredients. This is the fun part, because you can be as creative as you want. There is no wrong way to charcuterie, you guys. Depending on what you and your guests’ particular tastes and food preferences are, your epic board might look completely different from someone else’s, and that’s okay! The list of “acceptable foods” is extremely large and includes many different types and flavors, so you really can’t go wrong here. I would highly recommend checking out Trader Joe’s (if you have one near you), in order to do your charcuterie board grocery shopping. They have an amazing selection of cheese’s, many of which I’ve tried and loved. They also have an impressive nuts and dried fruits aisle, as well as, a really unique selection of tasty cracker options. So, at the very least, it’s definitely worth checking out! Of course, I might be slightly biased as I have a very real obsession with all things Trader Joe’s-related. (You can read more about some of my favorite TJ’s snacks here.) But, regardless of where you choose to do your grocery shopping, here are the ingredients you’ll want to consider picking up for your charcuterie spread:
- The Meats – Choose 3-4 different types of cured meats, in an assortment of mild, medium and bold flavors. My go-to’s are: pepperoni, salami and prosciutto. Some other great meat options include: chorizo, pancetta, smoked salmon (I know it’s a fish, but work with me here), summer sausage, herb-roasted turkey, slices of ham, sopressata, etc.
- Cheeses – The pinnacle of any epic charcuterie board is, obviously, the cheese. Choose 3-5 different kinds, or approximately 3 oz. per person (read that online somewhere.. cause although I might be acting like it, I’m not actually an expert, haha). Again, try to pick cheeses in a range of mild, medium and bold flavors. Also, make sure to include both hard and soft cheese options for texture. I believe that all cheeses are created equal, but here are a few great options to get you started: brie (soft), goat cheese (soft), gouda (mild), blue cheese (bold), sharp cheddar (bold – my FAVORITE kind of cheese), gruyere, pepper jack (spicy), havarti, manchego (firm), mozzarella (mild), pecorino (hard) aged asiago (firm), etc.
- Crackers & Breads – Choose 2-3 different cracker and/or bread selections to pair with your meats and cheeses. This is the one time when sticking with mild, less-flavorful options is probably best. The main attractions are the cheeses and meats, so choosing a plain base allows those flavors to shine. I’m a big fan of combining thin crispy crackers with thicker french baguette slices, but here are a few other examples to aid in your selections: multi-grain crackers, gluten-free crackers, fruit and nut crackers, italian breadsticks crackers, mini toasts/crostinis, french baguette slices (serve them toasted or as is), buttery, flaky crackers, etc.
- Fresh Fruits or Veggies – Choose 1-2 fresh fruits. Adding something sweet to the mix is a great way to cleanse the palette and balance out all of the saltiness from everything else. If you’d like to throw in some veggies, as well, go for it! Bell peppers, cucumbers, tomatoes, and artichokes are all great vegetable pairings for a charcuterie spread. This is the one category where color should come into play when choosing your items. The more color variety, the more aesthetically pleasing and “epic” your spread will be. I typically prefer to stick with fruits and veggies that’re in season, but here are some ideas for fruit choices: grapes, blackberries, blueberries, cherries, pear slices, apple slices (pairs perfectly with cheese), melon, etc.
- Jams, Dips and Spreads – Pick 1-3 dips, jams or spreads for added flavor. Both spice and sweetness work to balance out your dry, salty foods. They’re also great for spreading onto crackers and making meat, cheese & cracker sandwiches. Here are some options to get you started: fig spread, hummus, white bean dip, honey, hazelnut spread, stone ground mustard, jam/fruit preserves, red pepper jelly, etc.
- Dried Fruits and Nuts – Choose 2 nut options and 1-2 dried fruits (if you want to). Again, select a mix of both sweet and savory flavors. Some of my favorite nut/dried fruit options are: pistachios, candied pecans, macadamia nuts, candied walnuts, almonds (in particular, I love the marcona almonds with rosemary from TJ’s), cashews, mixed nuts, dried mango slices, dried banana chips, dried apricots, dates, raisins, dried figs, etc.
- Miscellaneous – If there’s anything else you wish to include in your charcuterie board, by all means, do it! Like I said, there are NO hard and fast rules for what can and can’t be included in a charcuterie spread. Here are a few miscellaneous additions that often make an appearance in the world of cheese boards: olives, pickles, artichokes, dark chocolate, etc. Heck, even a little chocolate fondue could be appropriate!
Once you’ve made all of the necessary purchases for building your epic charcuterie display, it’s time to begin the actual “work” part of it, if you can even really call it that. First, take care of any prep. work that needs to be done, things like cutting up foods, toasting breads, etc. I’ve listed some of the most common preparation activities you’ll be engaging in, below:
- Cut up any hard cheeses into slices or cubes (make sure they’re small enough to fit onto crackers). Just remember to package and refrigerate these if you’re prepping them more than 10 minutes before your guests’ arrival. Nobody enjoys stale cheese, not even me.
- Cut up any veggies (like bell peppers, cucumbers, etc.), and slice up any fruit (like apples, pears, etc.) These can also be put in tupperware and stored in the fridge until about 10 minutes before guests arrive.
- Dish out dips, spreads, and jams into small glass bowls or ramekins for a prettier, more aesthetically-pleasing display. Additionally, distribute any overly messy food items into small bowls or containers, as well. You don’t want the juices from your olives to marinate the crackers and cheeses surrounding it.
- Slice up any bread (like french baguettes, etc.) into bite-sized pieces. If you prefer them toasted, then drizzle with olive oil and toss in the oven for about 8-10 minutes.
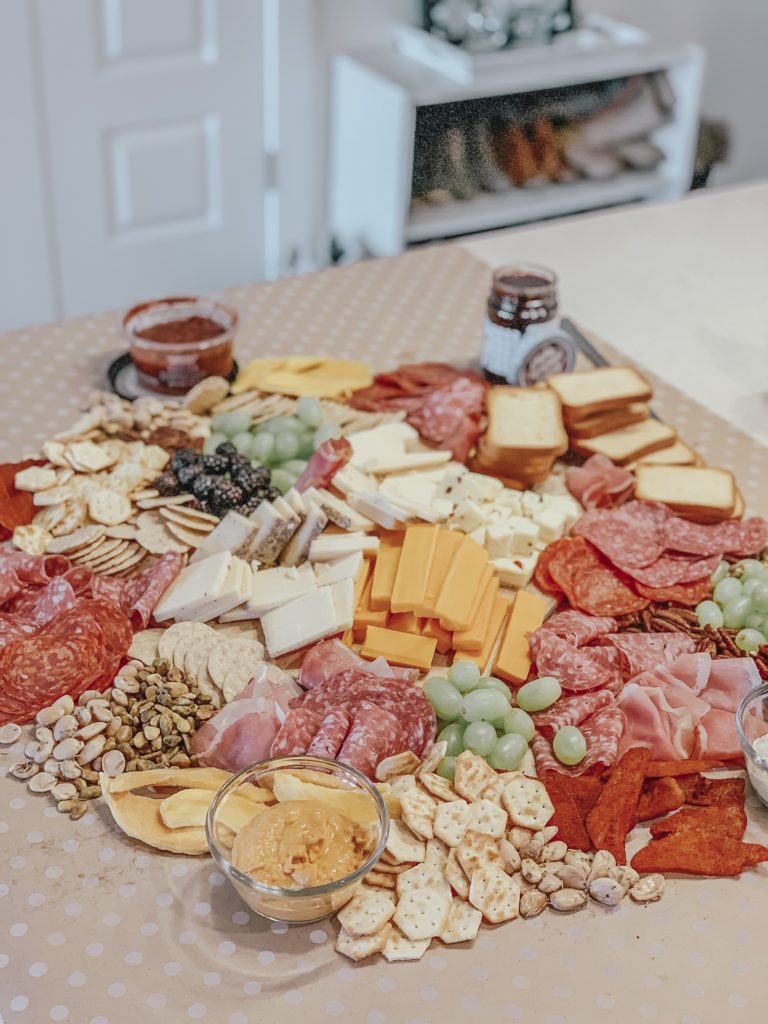
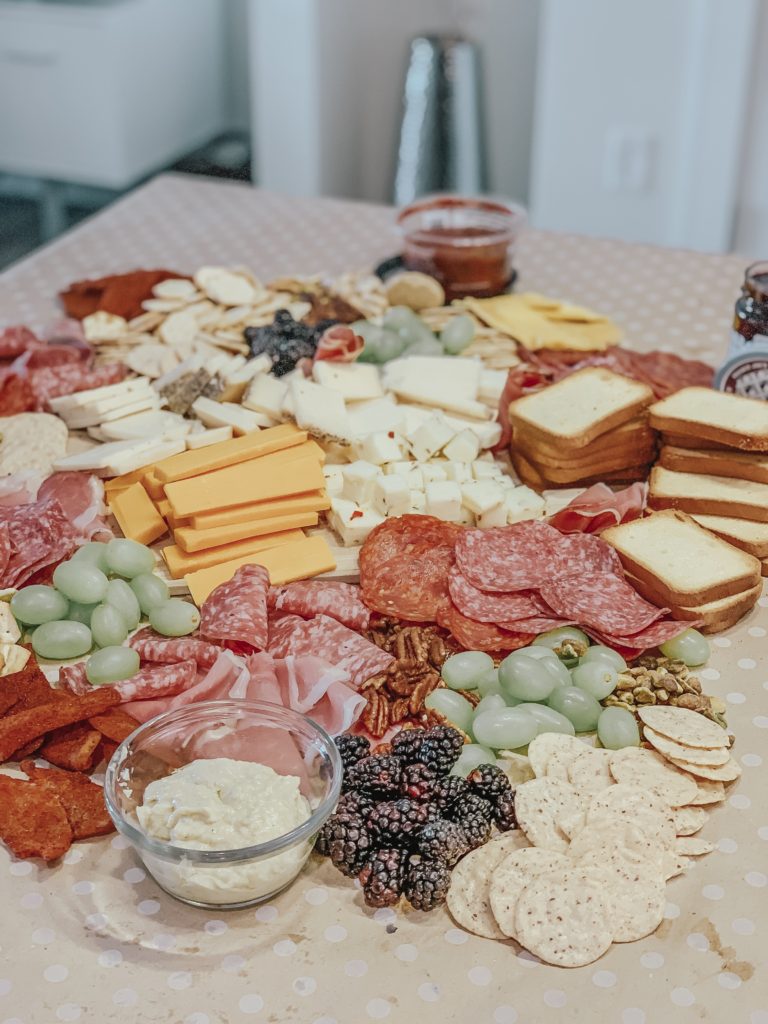
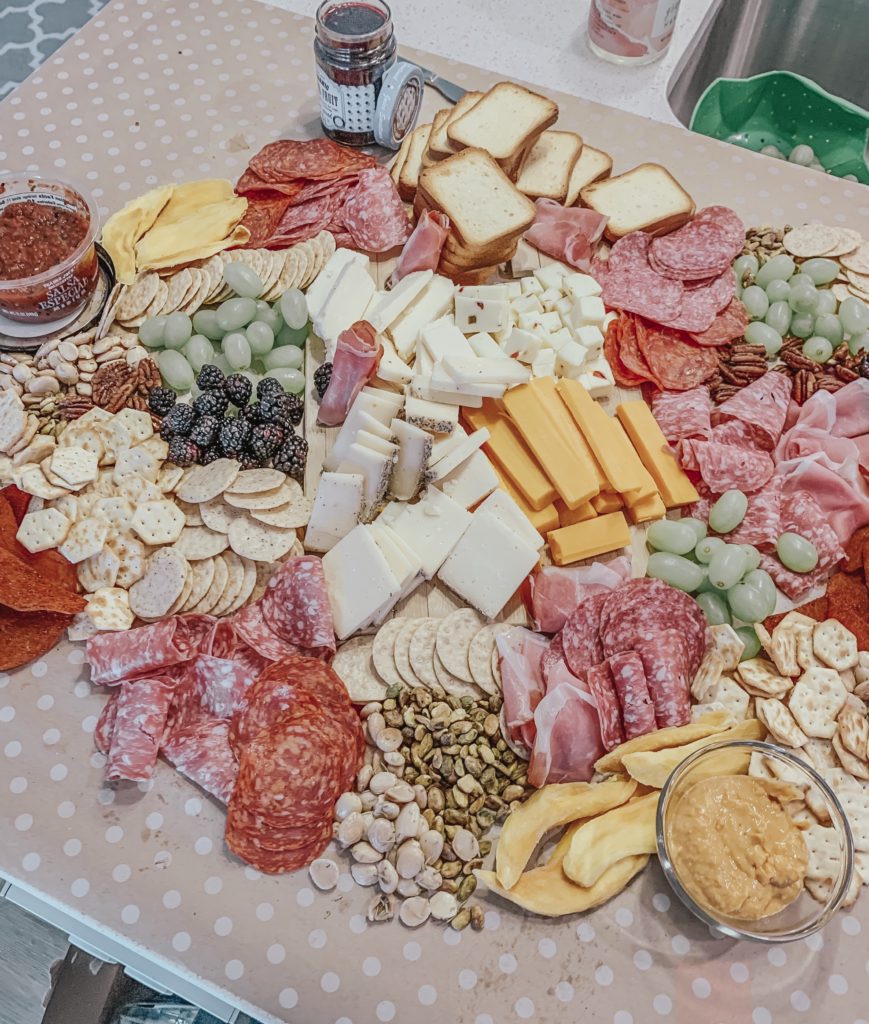
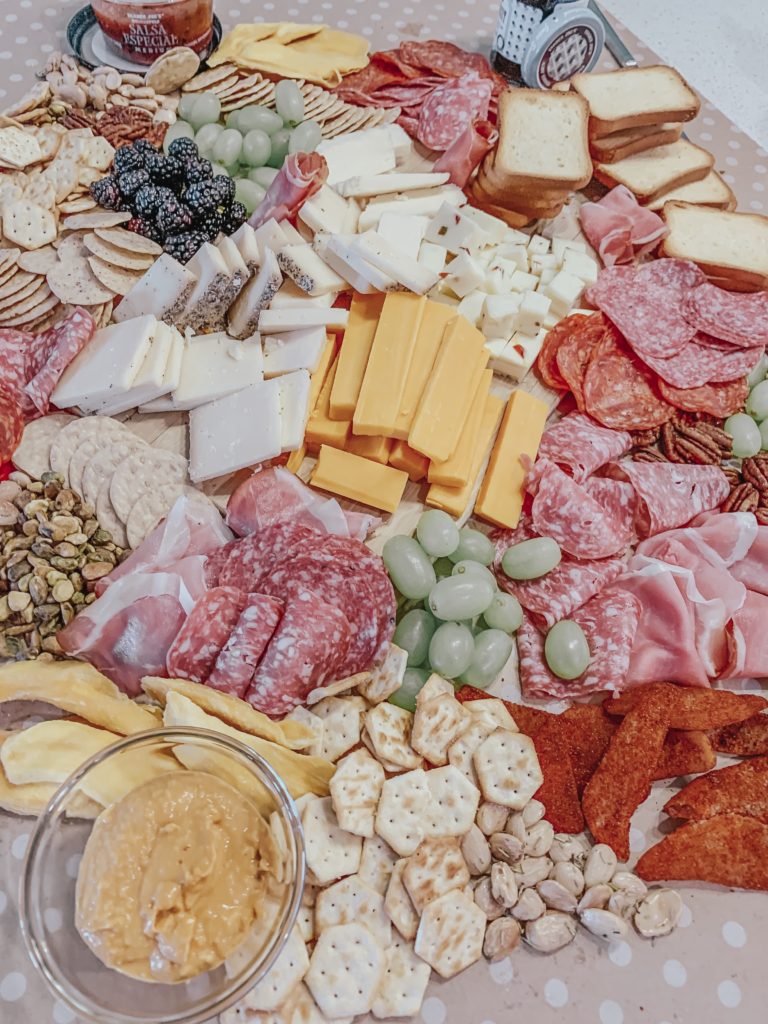
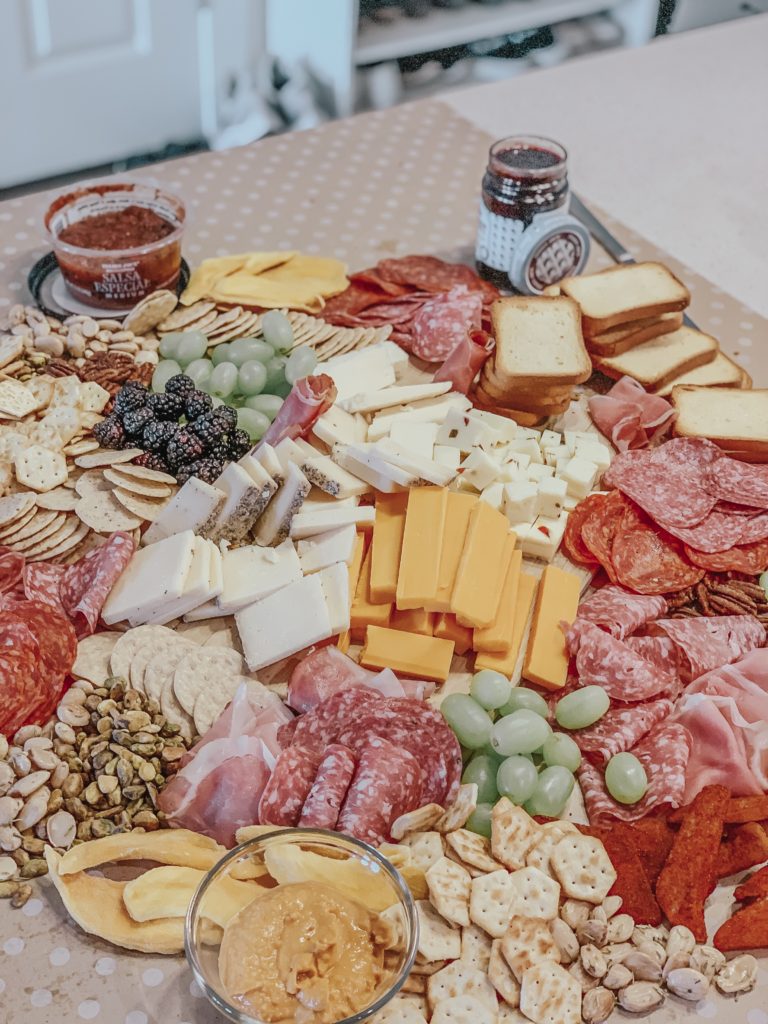
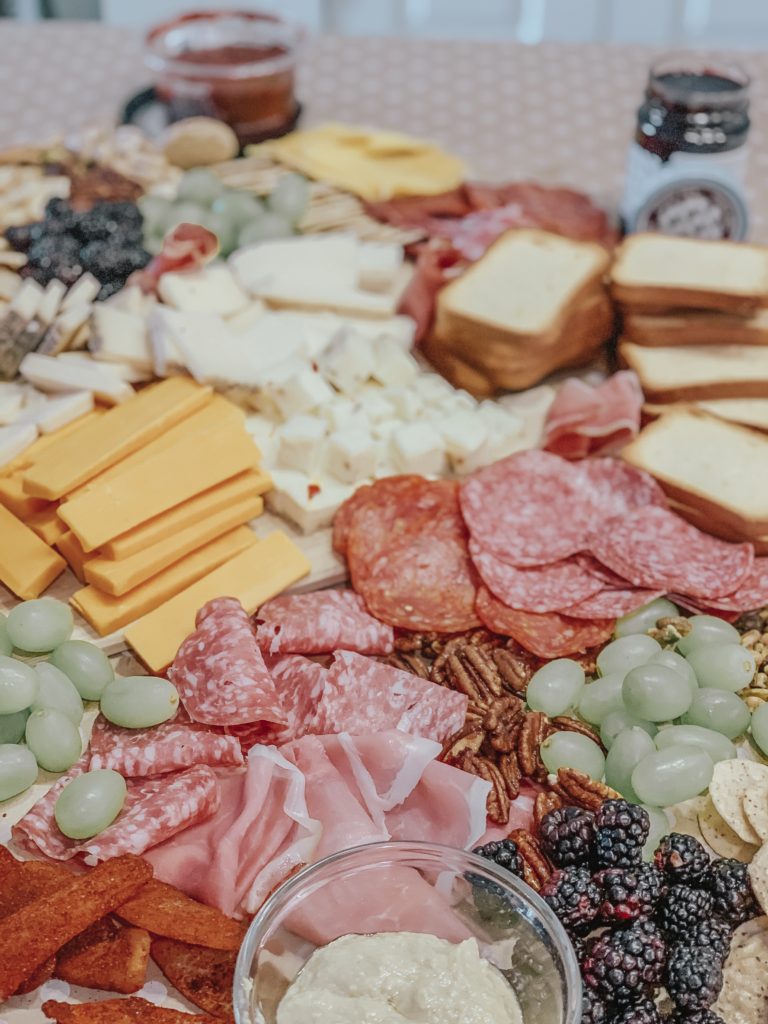
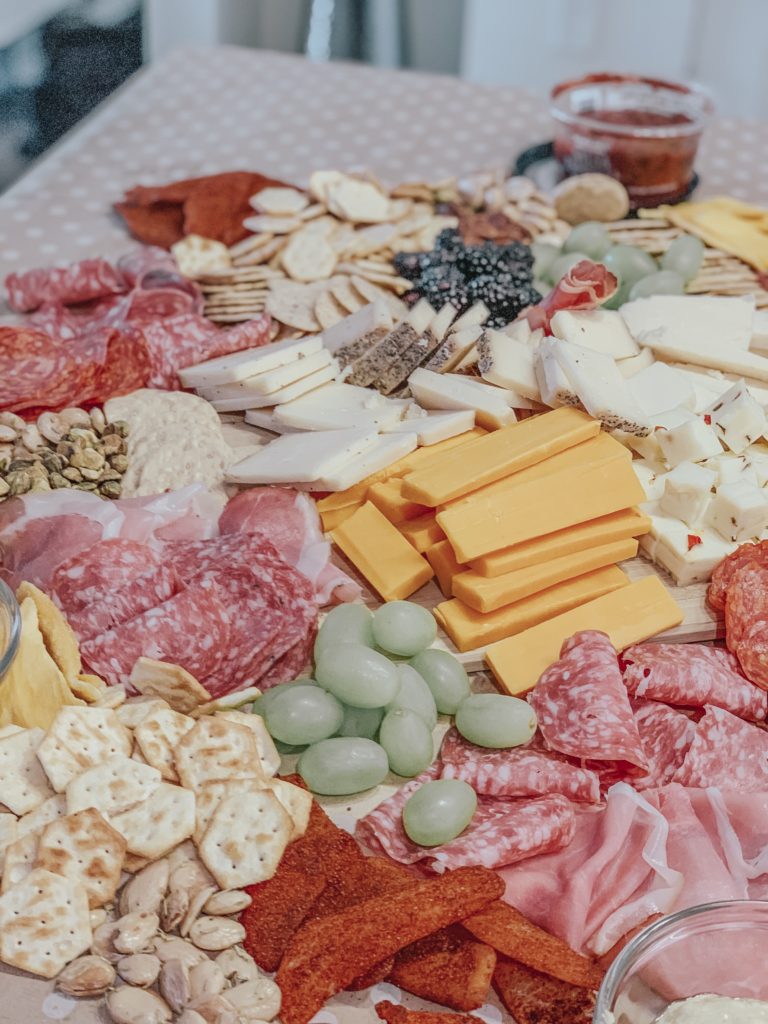
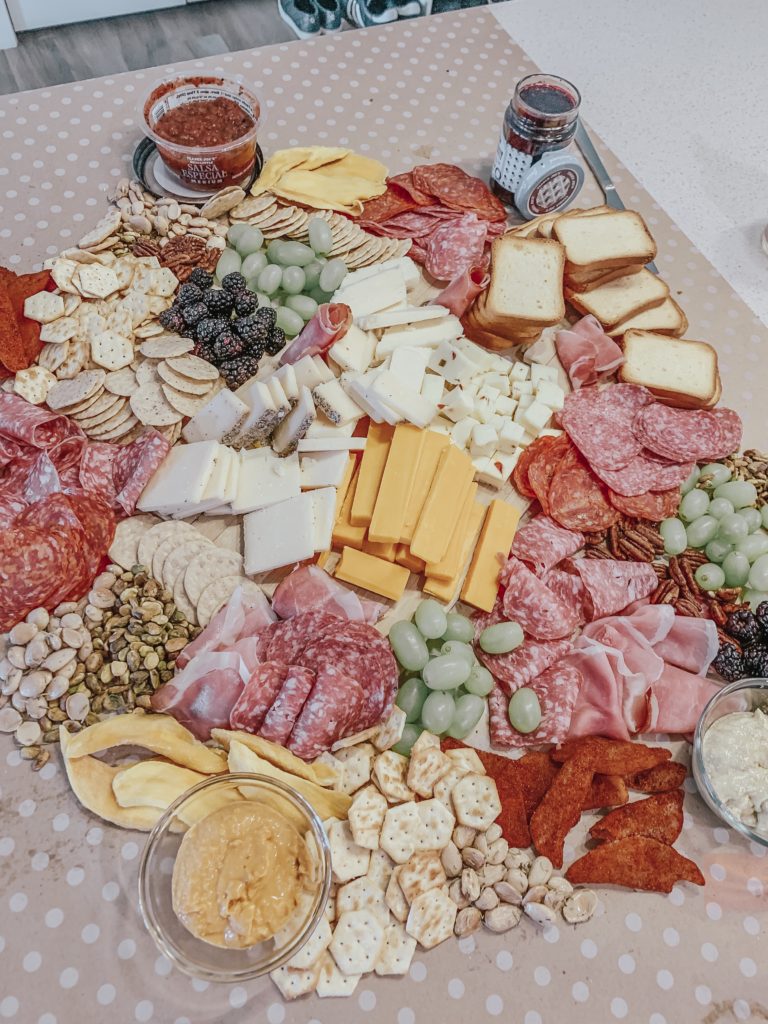
Once you’ve prepped your ingredients into the forms you want them in for serving, you can, finally, begin to assemble your charcuterie board. Deciding the exact layout of your spread is probably the most difficult part, but yet, is still surprisingly easy once you get started. First, you’ll need to lay out your charcuterie board base. This might involve a cutting board or two, a slate board, marble slab, kraft paper (what I used), or a combination of those things. I purchased a roll of brown kraft paper from Michael’s and covered one whole section of our bar-top with it, taping it down underneath. In addition, I laid out a marble cutting board in the center of the kraft paper to hold all of the cheeses. Everything else I let flow out onto the surrounding kraft paper. I found it was easiest to start in the center of the spread and work my way out, filling in each area, section by section, and food by food. Here is a basic gist of the steps I followed for my charcuterie’s assembly:
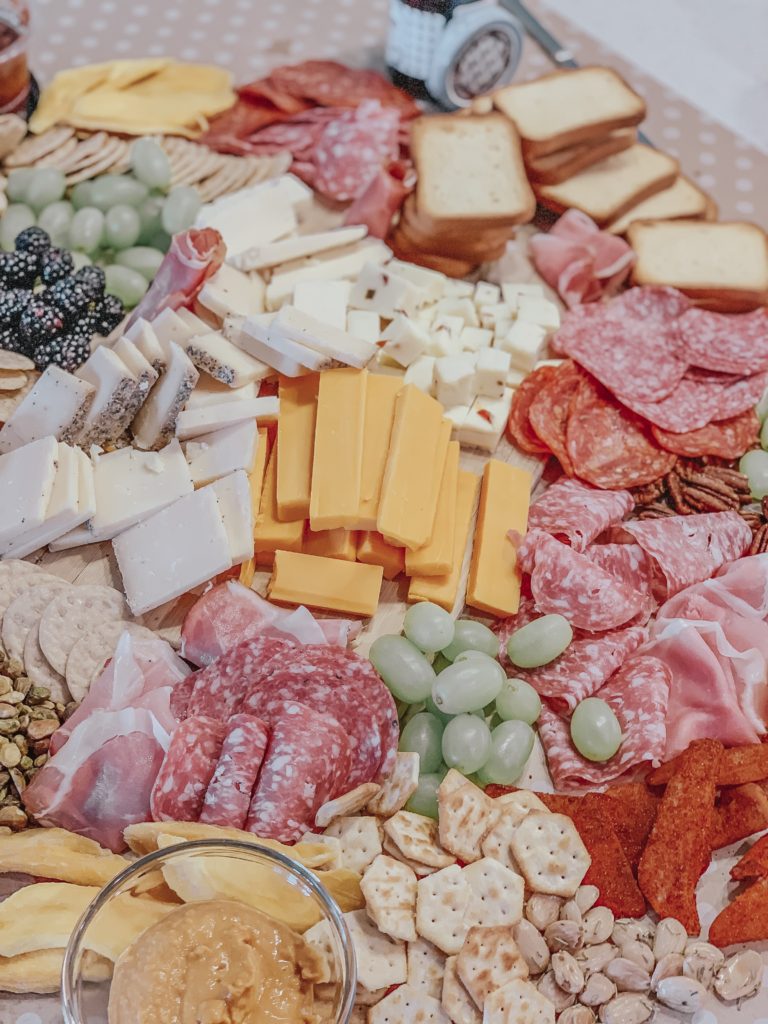
- Distribute your cheeses out first. You’ll have already pre-cut your hard cheeses, which can be piled up together in the middle, or spread out evenly across different areas. Serve soft cheeses with a knife for spreading it onto crackers and breads.
- After piling my cheeses onto a marble cutting board in the center of my charcuterie spread, I then filled in everything else around it, starting with the meat. You can create different shapes with your meats, for added visual interest. For example, salami and pepperoni can be folded in halves or bunched up into small bites. Prosciutto can be rolled up or ripped into sheets for stacking on top of crackers.
- Add in fresh fruits and veggies next. Again, spread each type out evenly throughout the spread. Grapes are the perfect charcuterie board accompanist because they’re easy to pull off in bunches of 4-8 grapes to a stem.
- Nestle in any small bowls containing dips, spreads, or jams. You’ll have already dished them out into their appropriate containers, so this will only take a second. Don’t forget to include a spreading knife so guests can dole out their own portions. If you’re serving anything else in bowls or ramekins (like olives or pickles), place those out at this time, as well.
- Add in your crackers and breads next. Fan out crackers in multiple areas across the board, with some situated next to dips/spreads/jams.
- Add in any dried fruits. By now your charcuterie platter will have started to look decently full, but continue filling in any noticeable gaps that you see. I wanted to cover every inch of my spread, until I couldn’t see any kraft paper peeking through underneath it.
- Place any miscellaneous food items onto the charcuterie board filling in any gaps that remain.
- And lastly, sprinkle in any nuts. Save these for last because they’re the perfect size for filling in tiny gaps and spaces with a small handful of them.
- Oh, and one more thing! You can’t forget to include your favorite beverage! With summer just weeks away, I think a rose wine makes for the perfect cheese board pairing.
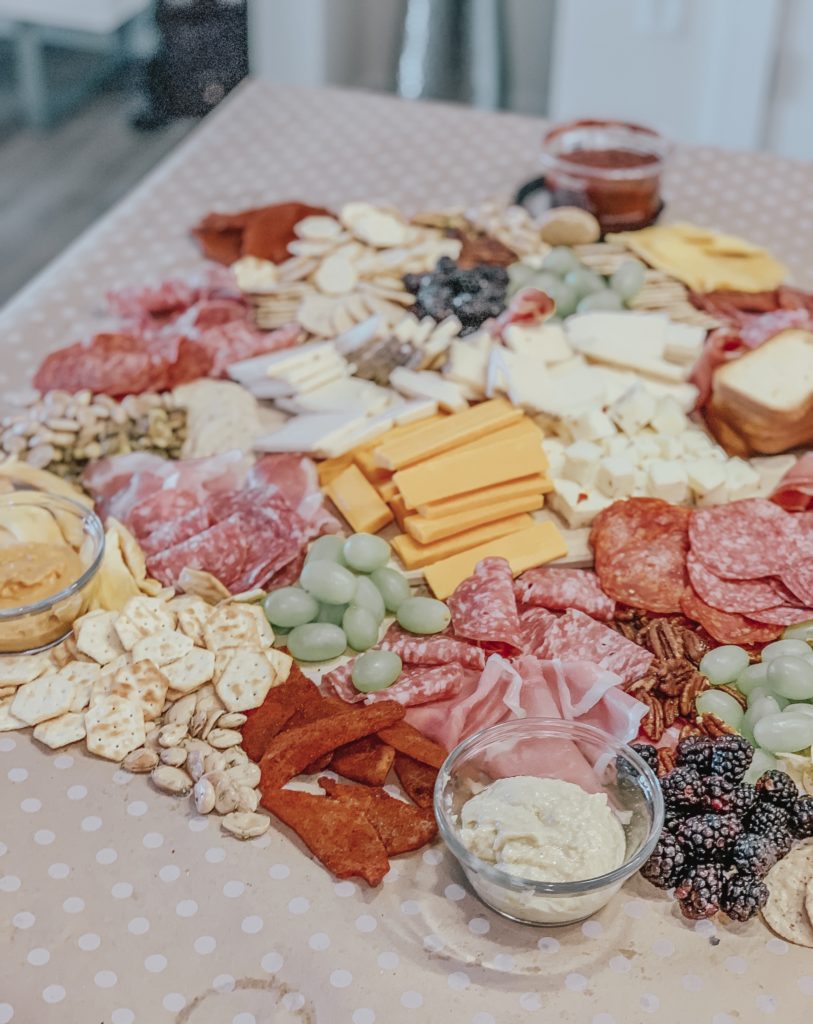
For reference, here are the items that I included in my charcuterie spread, shown in the photos above. All of the following I purchased at Trader Joe’s:
- Trader Joe’s Uncured Salame di Parma Mild Salami
- Trader Joe’s Sliced Prosciutto
- Volpi Prep Gourmet Pepperoni
- Trader Joe’s Unexpected Cheddar Cheese
- Trader Joe’s Toscano Cheese with Black Pepper
- Trader Joe’s Jalapeno Monterey Jack Cheese
- Trader Joe’s Goat’s Milk Cheese Medallions Marinated in Herbs
- Trader Joe’s New Zealand Organic Cheddar Cheese
- Trader Joe’s Roasted Gorgonzola Flavored Oven Crisp Crackers
- Trader Joe’s Savory Thins Crackers
- Trader Joe’s Brioche Toasts
- Trader Joe’s Organic French Baguette
- Trader Joe’s Cotton Candy Grapes
- Trader Joe’s Blackberries
- Trader Joe’s Organic Super Fruit Fruit Spread
- Trader Joe’s Organic Spicy Avocado Hummus
- Trader Joe’s Mediterranean Creamy & Smooth Hummus
- Trader Joe’s Deli Style Spicy Brown Mustard
- Trader Joe’s Dried Fruit Soft and Juicy Mango
- Trader Joe’s Dried Fruit Chile Spiced Mango
- Trader Joe’s Roasted and Salted Marcona Almonds with Rosemary
- Trader Joe’s Dry Roasted and Unsalted Pistachio Nutmeats
- Trader Joe’s Candied Pecans
Other Amazing Contenders from Trader Joe’s: Trader Joe’s Fig & Olive Crisps; Trader Joe’s Raisin & Rosemary Crisps; Trader Joe’s Multigrain Pita Bite Crackers; Trader Joe’s Dried Apricots; Trader Joe’s Sweet & Spicy Pecans; Trader Joe’s Speculoos Cookie Butter; Trader Joe’s Reduced Guilt Spinach & Kale Greek Yogurt Dip; and many, many others!!
And there you have it! That is how you can put together your very own epic charcuterie board. Think of it as a very loose outline that’s totally customizable and is open to your own interpretation, preferences and tastes. You can go as simple or as elaborate as you’d like. With wedding season and high school graduation right around the corner, now is the perfect time to hone your charcuterie-building skills. Whether it be for a bridal shower luncheon, bachelorette party cocktail hour, graduation party food or simply as refreshments for a summer evening at home with friends, the charcuterie board is the ultimate crowd-pleaser. I really hope you find this post useful! Let me know in the comments below if I’ve convinced you to put your charcuterie-building skills to the test! Bon Appetit!
XOXO,
Kenzie


I shall do this for our Summer Bash. Wish you were here😘
Love it!! It looks faaaaabulous and delicious!